Basic Installation Curving Method
1.At the rail bending point, align the 0°
point of the bender with the end of the
clamp and secure.
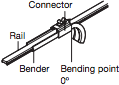
2.Hold the bender and the rail and gradually
bend the rail to the graduation mark of
the desired angle.
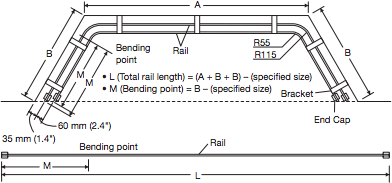
| Window type | Attachment type | L (Total rail length) | M (Bending point) | |
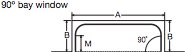 |
Single attachment |
R115 use | (A + B + B) –239 mm (9.4") | B –150 mm (5.9") |
| R55 use | (A + B + B) –187 mm (7.4") | B –90 mm (3.5") | ||
| Double attachment |
Exterior side (R115 use) | (A + B + B) –239 mm (9.4") | B –150 mm (5.9") | |
| Interior side (R55 use) | (A + B + B) –427 mm (16.8") | B –150 mm (5.9") | ||
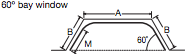 |
Single attachment |
R115 use | (A + B + B) –146 mm (5.7") | B –107 mm (4.2") |
| R55 use | (A + B + B) –133 mm (5.2") | B –72 mm (2.8") | ||
| Double attachment |
Exterior side (R115 use) | (A + B + B) –146 mm (5.7") | B –107 mm (4.2") | |
| Interior side (R55 use) | (A + B + B) –341 mm (13.4") | B –142 mm (5.6") | ||
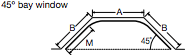 |
Single attachment |
R115 use | (A + B + B) –138 mm (5.4") | B –97 mm (3.8") |
| R55 use | (A + B + B) –133 mm (5.2") | B –72 mm (2.8") | ||
| Double attachment |
Exterior side (R115 use) | (A + B + B) –138 mm (5.4") | B –97 mm (3.8") | |
| Interior side (R55 use) | (A + B + B) –352 mm (13.9") | B –157 mm (6.2") | ||
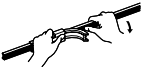
Using a Partial Bender
This is useful for making partial curves for curtain returns
at both ends of a bay window curved rail to prevent light
filtering into the room.
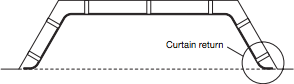
It can also be used as a curve bender (55R).
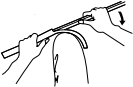
1. Insert the end of the rail
into the bender.
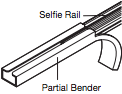
2. Slowly bend the
rail on your.